Monday, December 31, 2012

Draping a Backless Dress

For my next project I decided to make a backless dress using a draping technique. Draping is a great technique that can be used to create a multitude of designs and lets you let your imagination go wild! Its   also a relatively easy way to make a flat pattern without needing to know much about pattern making at all.

I did a couple of quick sketches to get an idea of what I was aiming for (sorry about the quality I'm not exactly talented at drawing!). I love the Breakfast at Tiffany's dress and that basically where I got the idea from but decided to modernize it a little. The skirt will be gathered and short to make it cute and girly. The open back will have pearl beads running across it to give it the classy feel. The front will be very simple with a boat neckline and side bust darts.

Back of the dress with pearls running across

Front of the dress with simple bodice and gathered skirt


So here goes.....

What you will need:

- muslin or other cheap fabric in a light color
- dress form in your size
- scissors
- lots of pins
- something to mark the fabric chalk or a pencil will work fine


1. Cut out a piece of muslin that will fit fully over one side of the dress form - add a few inches extra and overestimate as its a pain when you cut it too small. Then fold this piece in half and iron down the fold line so it leaves a crease mark.

2. Lay the fabric over the dress form so that the fold line goes down the middle and pin in place down the centre line.


3. Smooth out the fabric to the arm holes and neckline and pin in place. You will need to make slashes at the neckline and arm holes to get it to fit properly. You will only need to do this on one side as we will just mirror the pattern at the end. At this point I also cut off quite a bit of fabric off the bottom to make it more manageable as this is only going to the waist I don't need it to be that long. 


4. I decided to add a standard bust dart to my design but remember you can put this dart anywhere you want for your own design. To make the dart pinch the extra fabric and pull in the direction you want the dart.  


Make a fold in the excess fabric so it looks like a normal dart making sure everything stays smooth. 


Pin this down and hey presto there is your dart!


5. Draw around the neckline and arm hole using your chalk or pencil according to your design. Now trim the edges of the muslin so its a little more neat and today. Add slashes where you need to. You want to leave about 2 inches on all the seams in case you need to add any fabric later.


So thats the front draped and done now for the back...

6. As you did with the front cut a piece of muslin so it will over the entire back with some excess and fold down the center and iron in the crease. Pin the muslin down the center line of the back on the dress form. Smooth it out to the shoulders and arms. I am not adding any darts to my back so I pulled it pretty tight. You can add darts in the same method as we used for the front if you desire! 


7. Draw the outline of the back you want on the muslin and match the seams as well as you can to the front on the side and shoulder. Don't forget to draw side and shoulder seams on both the front and back. 


8. Cut out the shape of your design leaving an excess again just in case. Put slashes in where you need to. 


9. Remove the muslin from the dress form and you almost have a working pattern for the bodice of your dress - woohoo! For the back fold the muslin on the crease line you made and cut out the shape onto the other side of the fabric to make a full pattern. 

Sorry about the photos from here it got dark and the light in my sewing room is pretty dire! 


Cut out the center area and you have a full back done. 


10. The front is a little trickier because of the dart. First you need to mark the outline of the dart before taking the pins out. I just draw along the fold line with pencil. Once you have marked the dart unpin it and fold it over along the crease and cut the outline for the other side. 


11. To transfer the dart to the other side I use pins and pin down the line if the dart on both sides. Then flip over and you can see the pins on the other side. 


Then flip over and you can see the pins on the other side. Mark the dart using pencil and you have your full front bodice. 


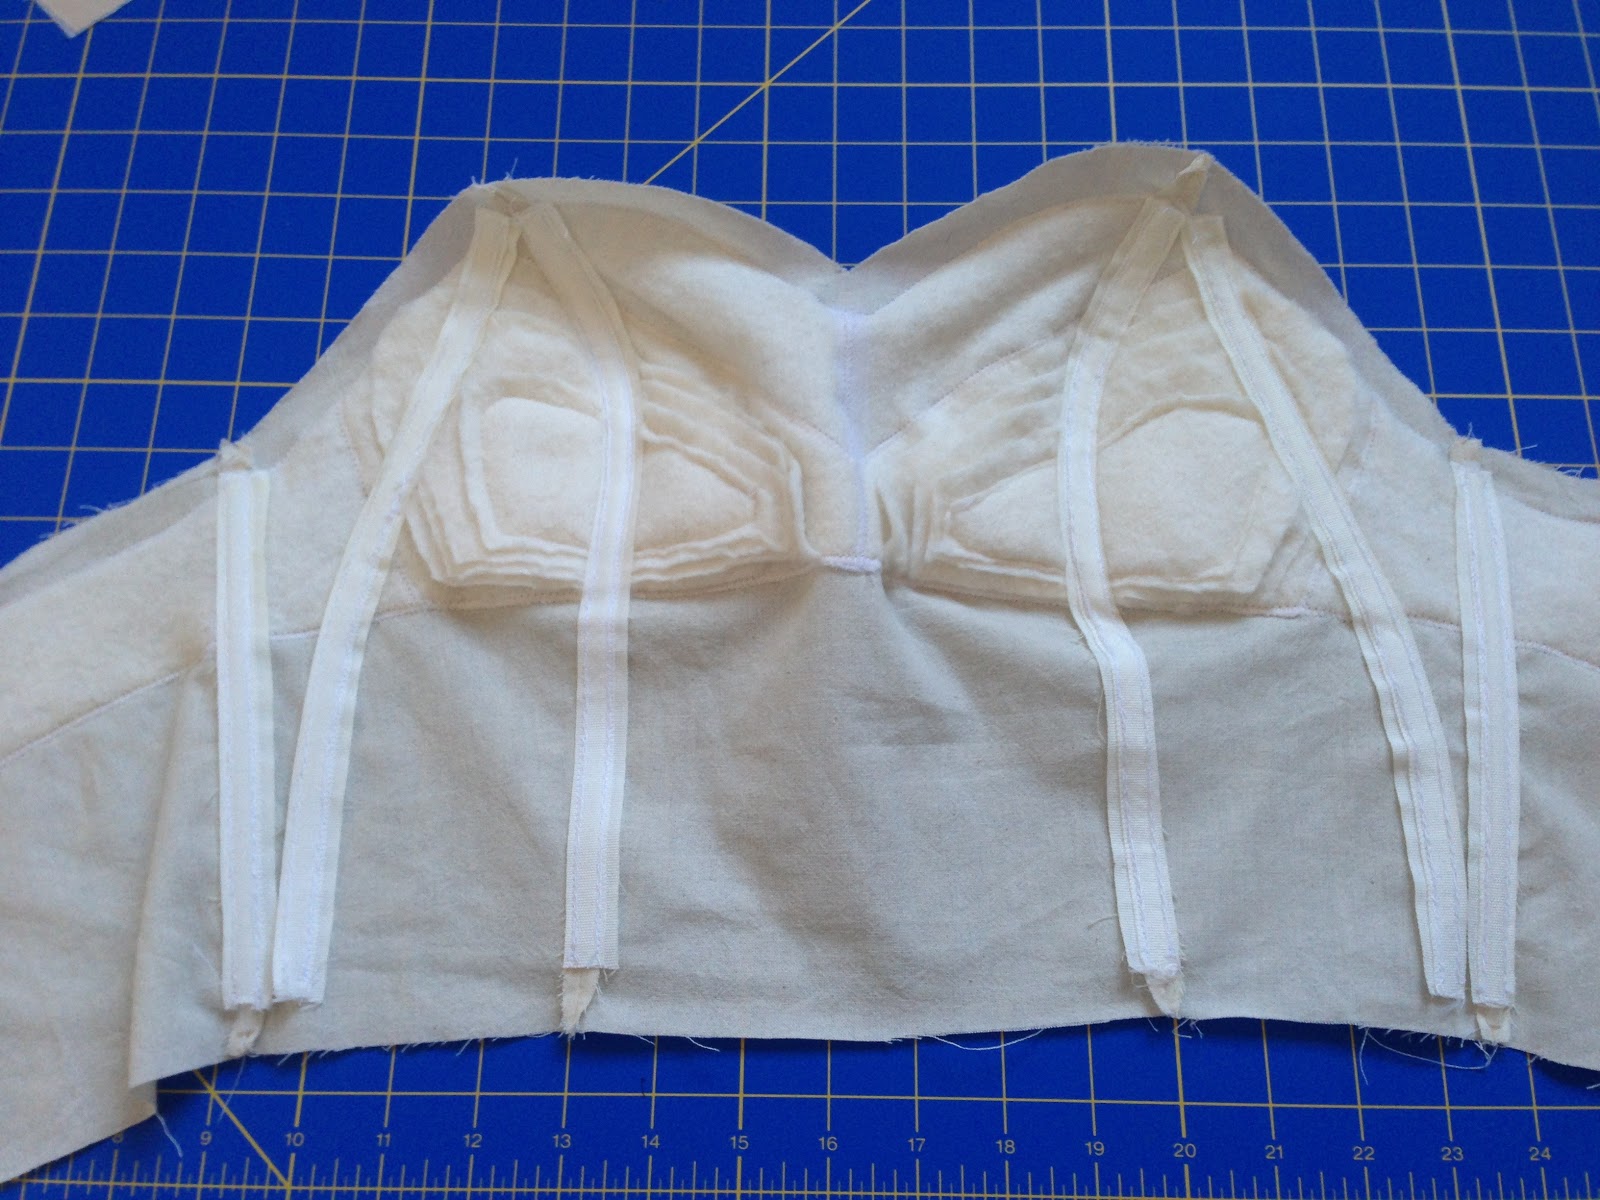
12. Try and test your newly made bodice! Sew the darts with a long stitch and sew front and back bodice together leaving one side or the back open so you can actually get it on. I am using a side zip so I left the side open. I didn't take any photos of this part sorry. Make any adjustments you need to make i.e. altering the bust dart or side seams etc. It is very important that you the fit right at this stage so take your time and be certain it fits the way you like before moving on. 

13. The next few steps are to make a flat pattern which you don't necessarily need to do if your just making a one off dress. If you unpick the muslin including the darts you can use this as the pattern. For both cases cut along the seam lines so you don't have any seam allowances on the pattern. This reduces the error that can be made when trying to add seam allowances at this stage. 

Cut out back pattern with no seam allowances
14. To transfer this to paper simply pin the back to paper draw around it then cut it out.


15. For the front cut it out the same as the back without any seam allowance and pin to the paper. To transfer the dart I use the pin method again.


For the dart add a triangle so it can folded over and sewn into the side seam. 


And thats finally it you have made yourself a unique design that fits perfectly using draping. All you have to do now is the simple task of actually making the dress! Stay tuned for photos of my completed project. 

Thanks for reading and as ever please feel free to leave comments and questions :-) 

Monday, November 26, 2012

Satin Flower Dress Photos

As promised here are the photos of the satin flower dress which I showed you all how to create in my last few posts.

This dress is now available to buy in my Etsy shop here


Let me know what you think! All comments and questions welcome :-)

Tuesday, November 20, 2012

Boning the Bodice and Beyond

I didn't get time to take many photos of this stage but here a a few pictures and descriptions of how I proceeded with the bodice...


I decided to add three strips of boning to each side to give extra support for the bust. I used plastic encased boning. I removed all the plastic and sewed each strip of boning to the bodice by sewing a straight stitch either side of the channel for the plastic.

TIP: To smooth the tips of the plastic melt both ends with a lighter or match to remove any rough bits.


Then I just put the plastic back through the channels of the casing and sewed both ends down to stop any boning sliding out. Here is the finished bodice with boning.


I have noticed with a lot of strapless design that they leave you very flat chested because of the tight fitted structure, so to try and combat this I added a piece of elastic as sort of under wire to the bottom of the bust area. My hope was that this would pull in this area giving a more shapely look - worth a try. I pulled the elastic so it had a bit of a stretch between each piece of boning but not too much for it to ruffle the muslin. I sewed it to the boning and will attach it later to the zip along the center back seam. 

Close up of the elastic 'underwire' sewed to the boning just below the padded bra


Now all that was left to do was cut out the linings and satin bodice and sew it all together! Simple right! I forgot to take any pictures until right at the end so sorry about that. Hope you get the general idea though of how it fits together.

I used two different linings one in china silk and the other a cotton blend. The china silk was for inbetween the satin and the underconstruction so nothing showed through and the cotton lining was to make a nice finish on the inside of the bodice. Sorry about the photo I was doing this at night so the light was rubbish.

From top layer to botton: Satin - china silk - underconstruction - cotton blend lining

I like to do things in stages so I sewed each the satin to its lining and then the underconstruction to its lining.


Underconstruction to lining
Then I just sewed both layers together to make the final bodice.


The final thing to do was to sew twill tape to the seam pulling it a little tighter than the length of the actual seam. This makes sure that the top of the bodice stays hugged in as much as possible. I trimmed all the seam allowances and understitched as far as possible to make sure the lining stayed in place.


Here is the finished bodice on the dress form.


And drum roll please........

the final dress is finished with the skirt sewed on. Phew that was a lot of work! I hope you all like it!


And thats it another item for my Etsy shop ready to go. I will be taking photos of the dress this week to put on my shop so stay tuned for that. Any thoughts or comments are very welcome.

Friday, November 9, 2012

Making a Bust Not Fall Flat!

Making a strapless bodice I think is one of the most difficult sewing challenges because of the amount of techniques and different aspects you need to bring together in one garment. The construction is quite complex as I found out and can be a little bit of a headache but I hope its worth it in the end!

From my last post I perfected the shape and fit of the bodice and now I am ready to cut it out for real and start building the bodice.

I decided that I would add some padding to the strapless bodice so that the bust area doesn't end up looking to flat as it sometimes can in a strapless bodice. So this is where I started.....

1. Cut out a pattern from the orignal bodice pattern for the bra cups. I approximated the length I wanted the cups to be by measuring on myself from the top of the cup to under my bust. Remember do the measurement with the bra you are intending to wear with the bodice or with no bra at all as in my case. Do not add any seam allowances as you will not be needing any - all will become clear later.


2. I used cotton batting for the padding which I bought from JoAnns. Its a lightweight material which is easy to work with. Here is a picture so you know what your looking for.


Cut out the pattern pieces out of the cotton batting and you have the basis of the bra - remember no seam seam allowances. 


3. Now to sew it together. To make a smooth cup I am not going to use a traditional seam. The pieces are actually butted up together and sewn using a zig zag stitch. For this you will need some twill tape or stay tape. Both work fine but for this case I used stay tape. Here is a picture so you know what I mean.


So what you need to do it cut a pieces of stay tape slightly longer than the length of the seam and pin to one side of the seam. Then pin to the stay tape to other side of the seam so the semas join in the middle. 


Sew down the center of the seam making sure you catch both edges and you will have something that looks like this. 

Wrong side with the stay tape visible

Right side of the cup where you can see the zig zag stitch

4. Use this method for all the seams and you will end up with super smooth bra cups.


5. Now this part is optional depending on whether you feel more comfortable with or without padding in the bra. If your planning on wearing a strapless bra with the dress then this won't be necessary however, if you are not then it is worth doing to add some shape to the bust area. I looked at the shape of the padding in the bras I like most to decide on where to put the padding and I came up with a rough shape. I used pins to mark out the shape on the cup.


5. Pin a piece of cotton batting to the cup keeping the shape with the pins. Then carefully cut around the shape to make a flat base for the padding.


6. Simply cut out smaller and smaller shapes from the original and pin together to form the padding. Do this for both sides so you don't look lopsided!


Then sew the around the edge of the smallest piece to hold all the bits together.


6. Next step is to fray the edges of the batting so it gives a smooth finish to the cup. Do this by gently tugging out the edges with your nail. In the picture you can see where I started to do this on the larger layers and where I haven't done any smoothing. I hope this makes sense! 


Finished padding with all edges smoothed into each other

7. Sew this padding into the bra cups making sure you have both sides as symmetrical as possible. I used a zig zag stitch to to this. And voila there you have a padded bra of sorts to stick into your bodice.


8. Final step is to sew the padded bra cups into the under construction layer. I made this layer from muslin as it has some good body and is easy to sew. Again I used a zig zag stitch. Make sure all the seams line up and that you leave a 1/2 seam allowance at the top of the muslin. 


Next stop boning! Stay tuned to see how I decide to do this... Feel free to comment and ask questions.

Happy sewing! 
Related Posts Plugin for WordPress, Blogger...